![]()
![]()
________________________________________
Set speed for moving along path, and "bump" distance

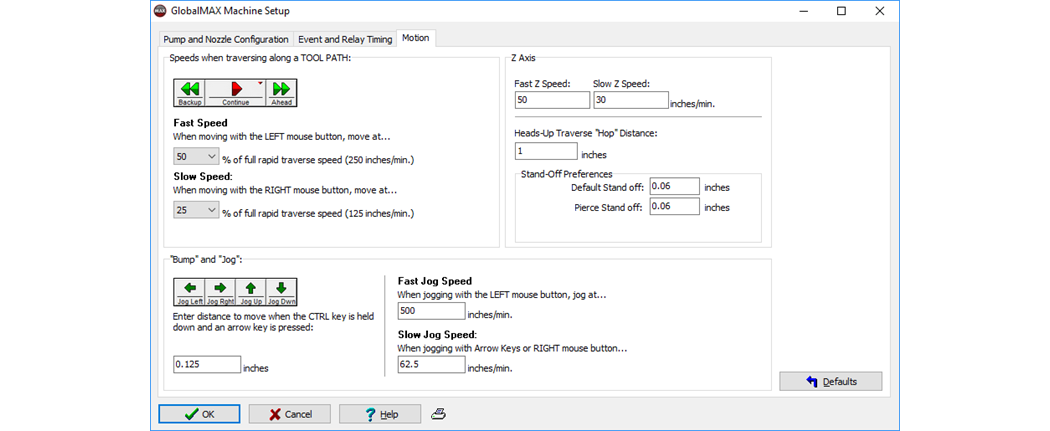
Use the Motion Preferences item on the Setup menu to control how quickly the abrasive jet head moves along the tool path when manually positioning the head. The Bump distance may also be changed on this dialog.

Use this dialog to set how quickly the abrasive jet head moves.
When the Begin Machining dialog is displayed, you can move forward and backward along the tool path. (This is useful if you had to interrupt making a part and want to begin again at a later point on the tool path.)
Fast Speed controls how quickly the machining head will move along the tool path when the Ahead or Backup buttons are clicked with the left mouse button.
Slow Speed controls how quickly the machining head moves along the tool path when the Ahead or Backup buttons are clicked with the right mouse button.
This section controls the automated Z-axis (up/down motion), if this option is installed. If an automated Z-axis is not installed, this section of the dialog will be grayed out.
If you have a dual Z-axis setup (two machining heads, both with an automated Z-axis) you use the same settings for both.
Fast Z speed
How quickly the Z-axis should move when the movement buttons are clicked with the left mouse button. The default setting is 75 inches per minute (190.5 cm per minute).
Slow Z speed
How quickly the Z-axis should move when the movement buttons are clicked with the right mouse button. This rate is typically slower than when using the left mouse button. The default is 30 inches per minute (76.2 cm per minute).
Heads-up Traverse "Hop" Distance
This value is how high the Z-axis should move upwards when it encounters a heads-up traverse. This distance should be enough to easily clear any fixtures that the machining head may encounter. The default value is one inch (2.54 cm).
Default Stand off
This is the default stand-off for the GlobalMAX. In most cases, use the regular value of 0.06". If a different stand-off is needed for one or two pieces, a one-time stand-off may be set using the Z-axis controls (right-click on the Stand-off button).
Pierce Stand off
The value set here will be the default stand-off value used for piercing. Depending on the material used, you may want to increase this value to prevent nozzle clogging (during piercing the nozzle stays in the same location for a while, which means that spray can bounce back into the nozzle).
Stall distance
The stall distance is how far the nozzle moves in the down direction before it starts moving up whenever it does an automatic stand-off during a tool path. If the nozzle is sitting on the material already, and the stall distance is 0.125" (0.3175 cm), then the controller will send 0.125" (0.3175 cm) worth of pulses to the Z-axis to push it down. Since the nozzle is already sitting on the material, it will "stall" instead.
This value does not affect the distance used when the Stand Off button is pressed on the Z-axis control. In this case the "stall distance" is always one inch (2.5 cm).
Move the machining head by using the arrow keys on the keyboard, or by clicking on one of the Jog buttons. The machining head can move at three different speeds:
Fast Jog
Click on a Jog button with the left mouse button, or hold down the Shift key and press an arrow key. This will move the machining head at the "Fast Jog Speed" set on this dialog (default is 200 inches per minute [508 cm per minute]).
Slow Jog
Click on a Jog button with the right mouse button, or press an arrow key. This will move the machining head at the "Slow Jog Speed" set on this dialog (default is 25 inches per minute [63.5 cm/min]).
"Bump"
Hold down the Ctrl key and press an arrow key, and the machining head will be "bumped," or moved exactly the distance set here (default is 0.125 inches or 1/8th of an inch [0.3175 cm]). This is useful to move the machining head in small increments.
Print settings
There is a Print button to the left of the OMAX logo at the bottom right of the dialog. You can print out the current settings by clicking on Print. This will print a screen shot of the current dialog, and is useful for keeping a record of the settings.
![]()