
________________________________________
Smooths out the joining of two entities
The Fillet command (pronounced "fill-it") lets you smooth out the joining between two entities. This helps avoid sharp angles that can weaken a part.

The two lines on the left were smoothed with a Fillet of 0.25" (6.4 mm)
1. Click the Fillet button. The Fillet dialog appears.

Radius
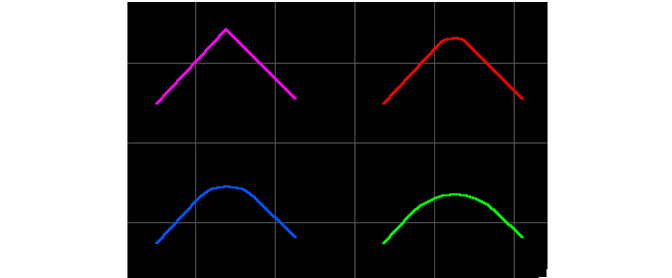
This sets the radius of the fillet. The fillet itself is essentially an arc with a radius (the distance to the center). A radius of 0.25" (6.4 mm), for example, will create a fillet using an arc with a radius of 0.25" (6.4 mm). The larger the radius, the flatter the fillet.

In the above figure, the two purple lines are the original figure. Three different fillets were applied: 1) Red: Fillet of 0.25 inches (6.4 mm); 2)Blue: Fillet of 0.5 inches (13 mm); 3)Green: fillet of 0.75 inches (19 mm).
Auto Radius
If "Auto Radius" is selected, then LAYOUT will automatically determine the radius based on where you click. This is a good choice if you know where you want the fillet to begin and end, but you don't know the necessary radius. Of the two points where the entities are clicked, LAYOUT will place the fillet at the point farthest from the intersection.
Trim affected entities
When this is selected, the "leftover" entities (the parts that extend past the fillet) are removed. In most cases, this is desirable. (If this is turned off, you can hold down the Shift key to force trimming for specific fillets.)
When this is unchecked, the lines are automatically divided at the join point. This makes it simpler to select the entities to erase, or otherwise change them.

An untrimmed fillet
2. Click the first entity to fillet.
The entity is highlighted in blue.
3. Click the second entity to fillet.
If you hold down the Shift key, you will force the entities to be trimmed, even if Trim affected entities is turned off.
4. The fillet is added.
If the two entities do not intersect, the Fillet command will add an arc joining the two. If the two entities have different Qualities, then the Quality of the first entity that was clicked on is used for the fillet. The Fillet command remains active so that additional fillets can be added. When finished, press Esc to return to the default Zoom command.
You can apply a fillet to traverse lines to speed up the making of a part. The abrasive jet head will move faster through a smooth curve than through an abrupt angle change. You can also enter in “0” for the radius of the fillet. This is a very useful (and common) way to join two disconnected entities, or remove gaps in corners. It’s very important to consider where you click when using the fillet command. Where the final fillet radius is placed, depends on where the mouse was clicked when selecting the entities to fillet between.
Each fillet is stored separately in the Undo list, so that you can undo each one individually.

Before and after

The direction of the fillet depends on where you click
